Note correction in the comments section
How to measure warp
tension
As a student I have been given information on
various practices for setting tension, such as gently releasing the brake,
which ratchet and pawl to tune first, counting the brake clicks and feeling the
warp itself. I wanted to find a way to measure warp tension, so that I could use
numbers to guide me in resetting my tension after each warp advance.
After searching on Amazon, I found a precision spring gauge,
referred to as a dynamometer (also known as a tensiometer) with a scale of 1 Newton or 100 grams. The
price was right, starting around 8 dollars and I purchased the Eisco precision
spring scale at a cost of twenty -four dollars. After experimenting with
different ways to attach the tensiometer to my loom , I finally settled on this
set-up. I first advanced the warp and did not reset the tension, next I hooked
the scale ( yellow end) onto a few warp threads in the middle of the warp. The
other end of the scale ( measuring hook part) was attached by a slack Texsolv
cord to a central treadle on my Glimakra loom.
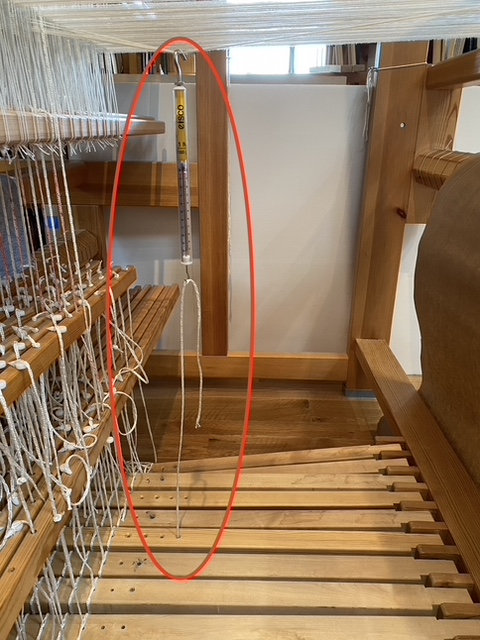
Now that the tensiometer was positioned I started my measurements. I measured how far
my warp threads sagged under the weight of the tensiometer alone and then I
started tightening the warp, one
click, two clicks and so on and at each point I measure the displacement and
noted the force being measured on the tensiometer. The table below summarizes
my observations. The direct measurements are the displacement and the force
from the tensiometer and these two direct measurements are sufficient to
provide guidance on resetting the warp tension after advancing the warp. The
right side of the table shows the calculated warp tension in both newtons and
lbs. The warp tension is calculated using the formula T=F*L/(4*d), which is a
reasonable approximation for small displacement, d and large distance, L
between the breast beam and the warp beam.
|
Number of Brake Rachet Clicks (increasing tension) |
Warp Displacement (d,cm) |
Force (F) Measurement from the scale ( Newtons)
|
Warp Tension Calculated ( Newtons) |
Warp Tension Calculated ( lbs) |
|
0 |
5.5 |
|
– |
– |
|
1 |
5.0 |
0.01 |
– |
– |
|
2 |
4.0 |
0.16 |
1.45 |
0.32 |
|
3 |
3.5 |
0.22 |
2.28 |
0.50 |
|
4 |
3.0 |
0.28 |
3.40 |
0.75 |
|
5 |
2.5 |
0.34 |
4.90 |
1.10 |
So what did I learn from this little experiment?
First of all, warp tension is measurable, just like they measure guitar string
tension or the string tension on your restrung badminton racquet. The tension
on the warp in this particular experiment increased by 30 times from an initial
brake position to the tightest brake setting. For my cloth I learned that I was
looking for a displacement of around 3 cm and a force of about 0.3 N on the
tensiometer. This setup is unintrusive under my loom, so I can leave it on and
practice resetting my warp tension as my weaving progresses.
Changing materials,
looms and many other factors will change these numbers and therefore
these exact numbers are not to be relied upon, but rather demonstrate the
possibility of learning how to effectively reset warp tension through
measurement. I hope you will give this a
try and develop your own guidance for the materials you like to use.